Lab 09 - Object detection
Object detection using neural networks
1. Activity Identity
| Activity title | Introduction to Robotics |
|---|---|
| Topic | AI / ML / Computer Vision / Robotics |
| Authors | Institute of Robotics and Machine Intelligence Dominik Belter, Jakub Chudziński, Marcin Czajka, Kamil Młodzikowski |
| Target learners | Bachelor |
| Estimated duration | 1.5 hours |
| Difficulty level | Intermediate |
| FOSSBot environment | Simulator or FOSSBot:v2 |
| Licence | CC BY 4.0 |
2. Learning Objectives and Competences
| ID | Learning outcome | Related competences | Assessment evidence |
|---|---|---|---|
| LO1 | Students will be able to train and evaluate a YOLOv11 neural network for object detection using a custom synthetic dataset in a cloud environment (Google Colab). | AI model training / Data processing / Computational thinking | Trained best.pt model file. |
| LO2 | Students will be able to integrate a trained AI vision model into a ROS2 ecosystem by creating a perception node that processes camera feeds and publishes annotated images. | AI model deployment / Sensor interfacing / ROS2 node development | Completed object_detection_node.py code, RViz2
screenshot showing bounding boxes. |
| LO3 | Students will be able to implement a ROS2 Action Server that performs visual navigation, using bounding box coordinates to calculate distance and control robot velocity. | Computational thinking / Robotics control / ROS2 Action implementation | Completed navigate_to_object_action.py code, video/GIF
of successful robot navigation. |
3. Prerequisites
Basic Python programming skills
Basic knowledge of ROS2 node development and sensor interfacing (check Lab 7)
Ability to capture evidence: screenshots or screen recordings
Google Colab for training the AI model (or local Python environment, but Colab is recommended for GPU access and ease of use) - in case of problems with training, a pre-trained model can be provided to students. The training notebook is available here: [add link here later]
Safety rules for powered electronics
If using a physical robot: you need to print the 3D objects. If you want to ensure that the objects are well-detected, you can use the Isaac Sim auto annotation script to generate a new dataset with the colors and textures of the printed objects. The script is available in the repository: [add link here later]
4. Required Material and Setup
| Category | Item | Version / Quantity | Notes |
|---|---|---|---|
| Hardware | Workstation | 1 per student | Linux PC with at least 8 GB RAM. An NVIDIA GPU with the
nvidia-container-toolkit is recommended so that
start_container.sh can use GPU passthrough; on a machine
without an NVIDIA GPU, use the included
start_container_no_gpus.sh instead. |
| Software | Google Colab | Latest | Requires a Google Account for training the YOLO model. |
| Dataset | FOSSBot Synthetic Object Dataset | 1,500 images | Available via Mendeley Data (Link in Step 1). |
| Software | Docker Engine | 24.0 or newer | Pre-installed on the lab workstations. |
| Software | FOSSBotEduSim simulator | latest from main branch |
Cloned from https://github.com/LRMPUT/FOSSBotEduSim
(instructions available in the repository). For these instructions, you
need the ros2_fossbot_edu_yolo version instead of the
“standard” version. If it’s not available, you can build it with the
provided instructions. |
5. Safety, Ethics and Accessibility Notes
If using the physical FOSSBot, ensure battery safety checks are performed before powering on. Do not leave powered robots unattended on raised surfaces (tables) as the visual navigation script may cause them to drive off the edge if the target object is placed poorly.
The model is trained on a synthetic dataset generated in NVIDIA Isaac Sim. Students should consider the “Sim-to-Real gap”—how models trained on perfect, simulated data might fail or exhibit bias when exposed to real-world lighting, shadows, and textures.
All tasks can be performed in simulation if a physical robot is not available.
6. Scenario and Problem Statement
The aim of the robot is to detect and classify objects in its environment using a camera and a trained AI model. The robot must process the camera feed, identify objects of interest, and make decisions based on the detected objects (e.g., navigate towards a target object).
7. Lab Workflow
| Phase | Student action | Expected output | Time |
|---|---|---|---|
| 1. Prepare | Train YOLO model + read about object detection | Weights of the trained model | [15 min] |
| 2. Build/Connect | Configure FOSSBot or simulator | Validated connection / Running simulation | [5 min] |
| 3. Object detection node | Complete code | Working ROS2 node for object detection + screenshot | [15 min] |
| 4. Action server for visual navigation | Implement the action server | Complete code + a screen recording | [50 min] |
| 5. Reflect | Answer synthesis questions | Short analysis | [15 min] |
8. Step-by-Step Instructions
Step 1 - Learn about the AI model and dataset
Because training a neural network is time-consuming, please first go to Step 2 and start training the model. While the model is training, you can read about the YOLO algorithm and its architecture.
- Object detection using YOLO
For a long time, early object detection systems used a “sliding window” approach or proposed thousands of different regions in an image, running a slow classifier on every single piece to see if an object was there. Then in 2015 came YOLO (You Only Look Once), a revolutionary model that integrated the detection and classification steps.
The original YOLO model
(Based on the paper: Redmon, Joseph, et al. “You only look once: Unified, real-time object detection.” Proceedings of the IEEE conference on computer vision and pattern recognition. 2016)
The original YOLO algorithm, introduced in 2015, threw away the slow, multi-step “magnifying glass” pipeline. Instead of looking at an image thousands of times, YOLO passes the image through a single Neural Network exactly once. It treated object detection as a regression problem. Here is how it works:
- The Grid System: YOLO divides the image into an
S x Sgrid. - If the center of an object falls into a specific grid cell, that specific cell becomes responsible for detecting that object.
- Each grid cell simultaneously predicts:
- Bounding boxes: The coordinates outlining where it thinks an object is,
- Confidence scores: How confident the model is that an object actually exists in that box, and how accurate the box is,
- Class probabilities: What the object is.
Below you can see the visualization of the YOLO algorithm. The image
is based on the original YOLO paper, but prepared by the authors of this
lab on a picture from the dataset that will be used in this lab. 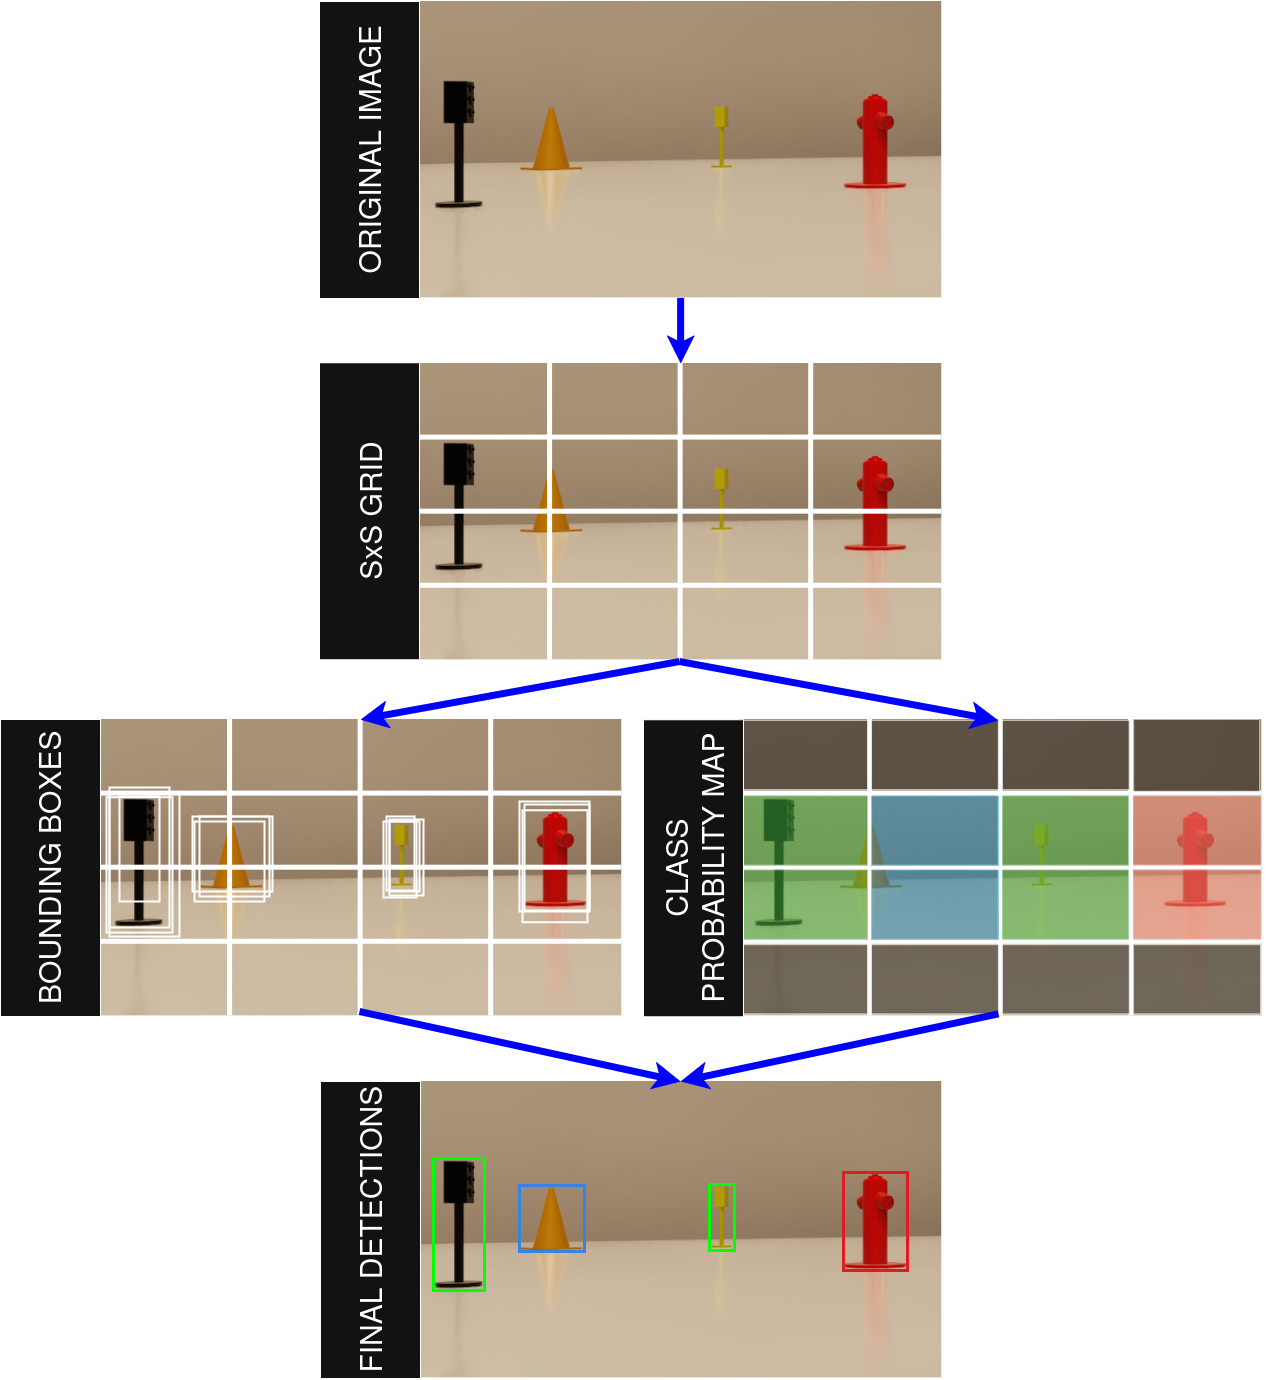
Because it processes the whole image globally and all at once, the original YOLO was capable of processing 45 frames per second, while Fast YOLO could process 155 frames per second. This made YOLO one of the fastest object detection algorithms at the time. The authors mentioned that only DPM was able to run in real time (at least 30 fps) but the quality of that method was significantly worse.
YOLOv11
(Based on the paper: Khanam, Rahima, and Muhammad Hussain. “Yolov11: An overview of the key architectural enhancements.” arXiv preprint arXiv:2410.17725 (2024).)
In 2024, Ultralytics released YOLOv11, which is a significant improvement over previous versions. While the original YOLO was a simple, straight-through network, YOLOv11 is divided into three specialized main parts:
The Backbone (The Feature Extractor): This part looks at the raw image and extracts important patterns (edges, textures, shapes). YOLOv11 uses a highly efficient structure called the C3k2 block, which uses smaller math operations to extract features much faster than older models,
The Neck: The neck gathers features of different sizes from the backbone and mixes them together. This helps the model detect both massive objects (like a bus) and tiny objects (like a bird in the distance - this was a challenge for the first version). YOLOv11 introduces an “Attention Mechanism” called C2PSA. Just like human attention, this allows the neural network to focus deeply on the most important parts of the image while ignoring the background.
The Head (The Predictor): This is the final stage that outputs the exact coordinates of the bounding boxes and the class of the object.
While the original YOLO only drew bounding boxes, YOLOv11 can perform many advanced computer vision tasks:
Object Detection: Drawing boxes around objects.
Instance Segmentation: Coloring the exact pixel outline of an object instead of just a box.
Pose Estimation: Detecting the “skeleton” or key joints of a human to track movement.
Oriented Object Detection: Detecting objects that are rotated at different angles.
- The dataset used in this lab is a custom synthetic dataset created for the FOSSBot robot. It contains images of 5 different objects (a cone, a cactus, a traffic light, a hydrant, and a pallet) that were spawned in a simulated environment in NVIDIA Isaac Sim. Additionally, multiple objects from the Yale-CMU-Berkeley (YCB) Object and Model Set were used to augment the dataset by covering the targets and creating more diverse scenarios. The dataset contains 1500 images with automatically generated annotations and is available at the following link: https://data.mendeley.com/datasets/ysprcvwpjk.
If you’re interested in creating your own dataset or 3D printing the objects, please refer to our repository.
- To learn more about object detection, you can watch the following video (in Polish): https://www.youtube.com/watch?v=s5RoJ6IiLVM. It is a recording of a lecture by Marek Kraft, a researcher in computer vision, machine learning and robotics. The lecture covers the basics of object detection, including the history of object detection methods, the YOLO algorithm, and its applications.
Step 2 - Train the model
Open the Google Colab website and log in.
You should see a pop-up window named “Open notebook”. If not, click on the “File” menu and select “Open notebook”.
In the “Open notebook” window, click on the “GitHub” tab.
In the “Enter a GitHub URL or search by organization or user” field, type the following URL:
https://github.com/LRMPUT/fossbot-object-detectionClick on the “Search” icon.
In the search results, click on the “Open” button next to the notebook named
training/FOSSBOT_object_detection.ipynb.
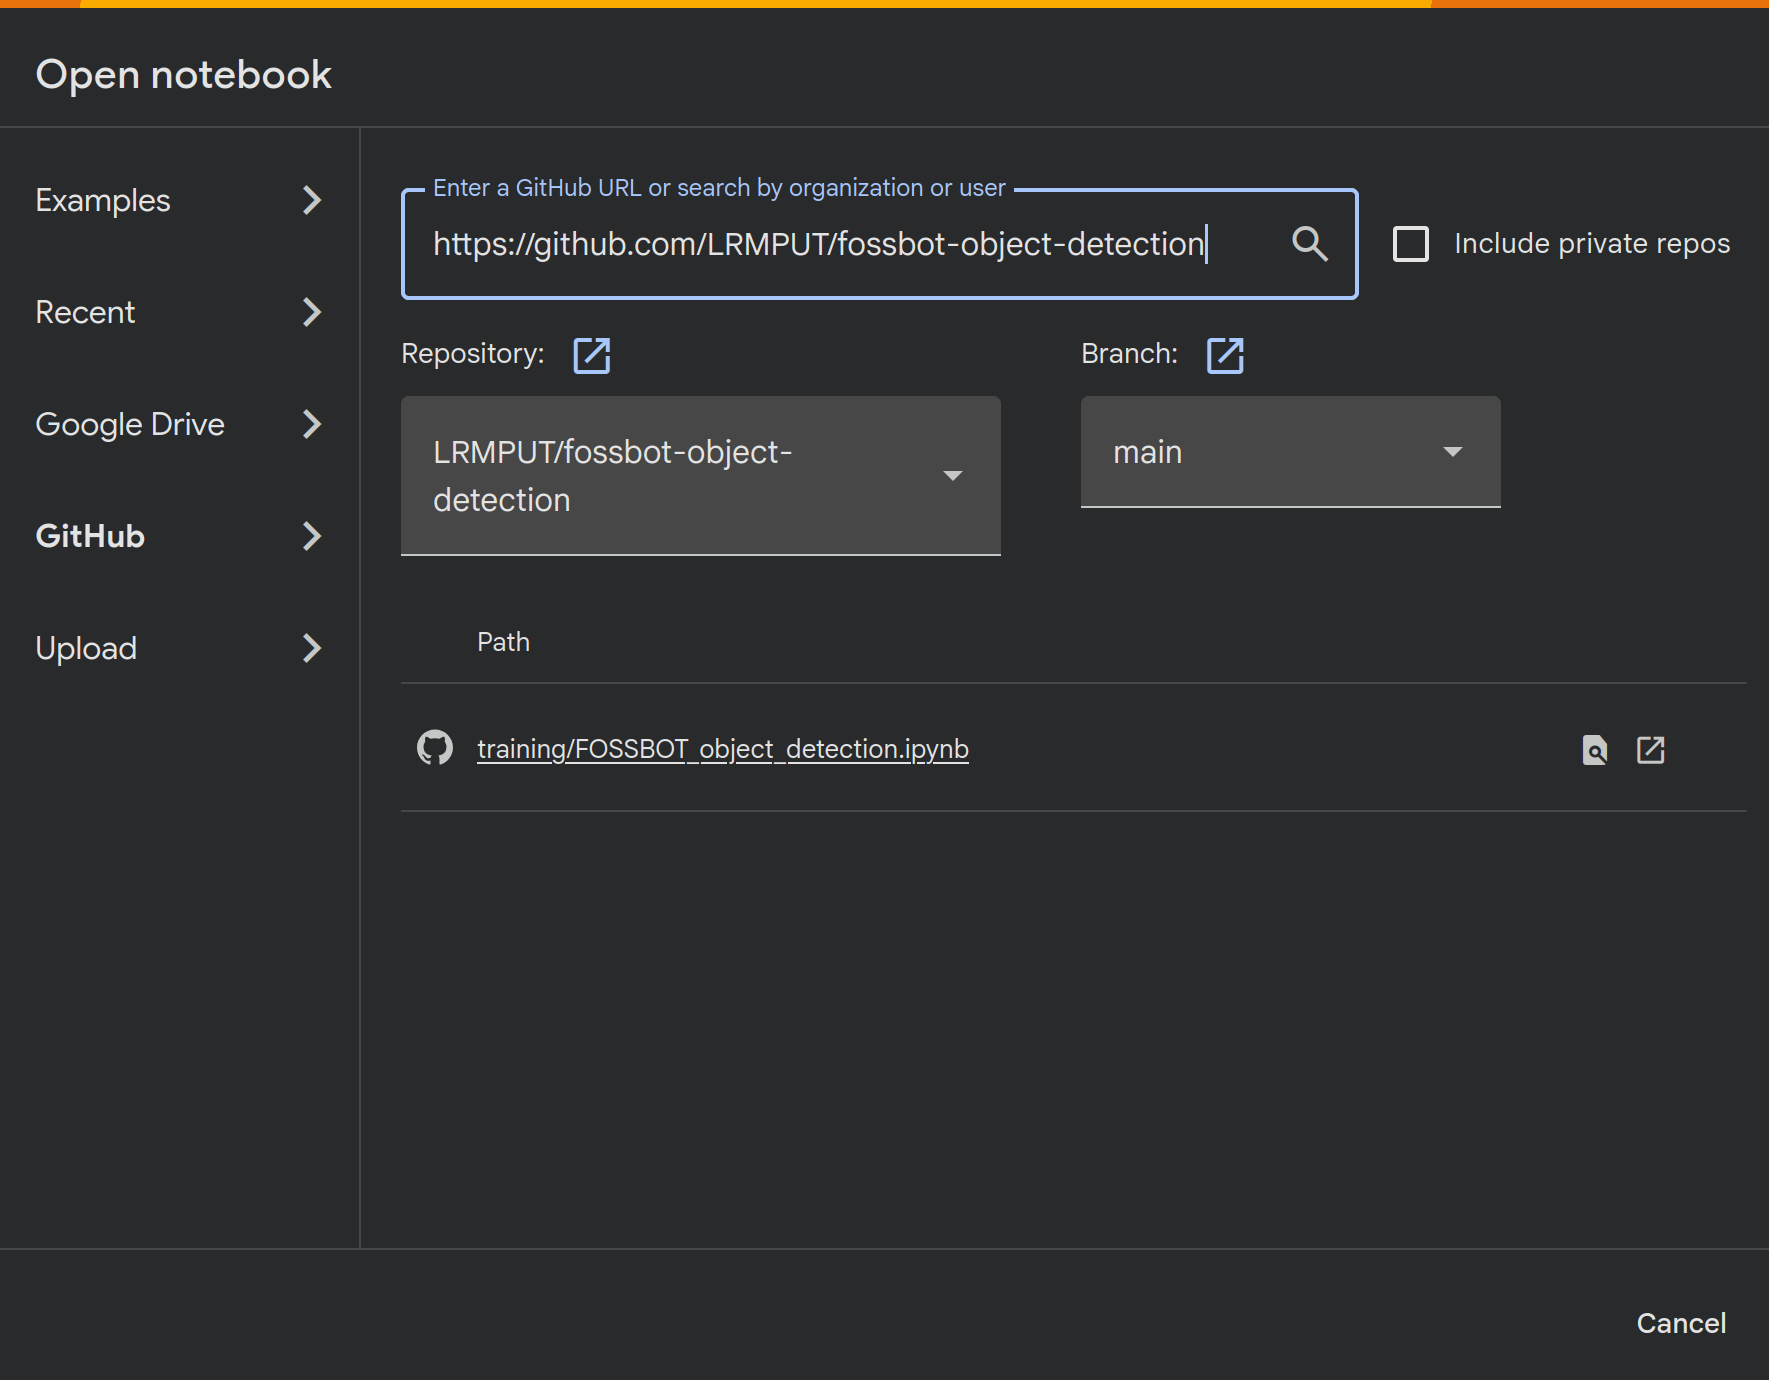
- The notebook will open in a new tab. Follow the instructions in the notebook to train the model using the provided dataset.
In case of issues
If it’s impossible to train the model due to technical issues, you can use a pre-trained model. The pre-trained model is available in the repository: https://github.com/LRMPUT/fossbot-object-detection/tree/weights.
Expected result: After completing the training, you should have a trained YOLOv11n model that can detect and classify objects in images.
Step 3 - Implement the object detection node
Go to the directory with the FOSSBot simulator or the physical robot’s ROS2 workspace. If you are using the simulator, start the Docker container.
Go to the
srcdirectory and create a new ROS2 package namedfossbot_object_detection. You can use the following command:
ros2 pkg create --build-type ament_python fossbot_object_detection --dependencies rclpy sensor_msgs cv_bridge- Inside the
fossbot_object_detectionpackage, prepare a directory to store the trained model. You can name itmodels.
mkdir fossbot_object_detection/modelsCopy the trained model file (e.g.,
best.pt) from the Google Colab environment to that directory.Create a new Python script named
object_detection_node.pyinside thefossbot_object_detectionpackage. This script will implement the object detection node.
touch fossbot_object_detection/fossbot_object_detection/object_detection_node.py- Copy the following code snippet into the
object_detection_node.pyfile. This code initializes the ROS2 node, subscribes to the camera feed, and processes the images using the trained YOLOv11 model.
import rclpy
from rclpy.node import Node
from sensor_msgs.msg import Image
# cv_bridge is a ROS package that provides an interface between ROS messages and OpenCV
from cv_bridge import CvBridge
from ament_index_python.packages import get_package_share_directory
import cv2
import os
from ultralytics import YOLO
import torch

class YoloV11Node(Node):
    def __init__(self):
        super().__init__('yolo_v11_node')

        # Declare ROS parameters
        package_share_dir = get_package_share_directory('fossbot_object_detection')
        default_model_path = os.path.join(package_share_dir, 'models', 'best.pt')

        self.declare_parameter('model_path', default_model_path)
        self.declare_parameter('image_topic', '/camera/image_raw')

        # Get parameter values
        model_path = self.get_parameter('model_path').get_parameter_value().string_value
        image_topic = self.get_parameter('image_topic').get_parameter_value().string_value

        # Setup Device (allows to select between CPU and GPU based on environment variable)
        self.device = self.select_device()
        self.get_logger().info(f"Using device: {self.device.upper()}")

        # Initialize YOLO Model
        self.get_logger().info(f"Loading YOLO model from: {model_path}")
        self.model = YOLO(model_path)
        # Move the model to the selected device
        self.model.to(self.device)

        # Setup CV Bridge and ROS Communication
        self.bridge = CvBridge()
        self.subscription = self.create_subscription(
            Image,
            image_topic,
            self.image_callback,
            10
        )
        self.publisher = self.create_publisher(Image, '/yolo/annotated_image', 10)
        self.get_logger().info("YOLOv11 Node has been started.")

    def select_device(self):
        # Read the environment variable.
        # It was set in the Dockerfile
        # Default to 'false' if it doesn't exist.
        is_gpu_enabled = os.environ.get('IS_GPU_ENABLED', 'false').lower() == 'true'

        if is_gpu_enabled:
            # The variable is true, but we must check if CUDA is actually available
            if torch.cuda.is_available():
                self.get_logger().info("IS_GPU_ENABLED is true and CUDA is available.")
                return 'cuda'
            else:
                self.get_logger().warn("IS_GPU_ENABLED is true, but CUDA is NOT available. Falling back to CPU.")
                return 'cpu'
        else:
            self.get_logger().info("IS_GPU_ENABLED is false. Using CPU.")
            return 'cpu'

    def image_callback(self, msg):
        try:
            # Convert ROS Image message to OpenCV format
            cv_image = self.bridge.imgmsg_to_cv2(msg, desired_encoding='bgr8')

            # Run YOLOv11 inference
            results = self.model(cv_image, device=self.device, verbose=False)

            # Get the image with bounding boxes
            annotated_frame = results[0].plot()

            # Convert the OpenCV image back to a ROS Image message
            annotated_msg = self.bridge.cv2_to_imgmsg(annotated_frame, encoding='bgr8')

            # Publish the image
            self.publisher.publish(annotated_msg)

        except Exception as e:
            self.get_logger().error(f"Failed to process image: {e}")

def main(args=None):
    rclpy.init(args=args)
    node = YoloV11Node()

    try:
        rclpy.spin(node)
    except KeyboardInterrupt:
        pass
    finally:
        node.destroy_node()
        rclpy.shutdown()

if __name__ == '__main__':
main()- Edit the
setup.pyfile in thefossbot_object_detectionpackage to include the new node script and model files. At the beginning of the file, import additional modules:
import os
from glob import glob
Inside the data_files section, add the model file:
(os.path.join('share', package_name, 'models'), glob('models/*.pt')),The install_requires section should include the
additional Python packages:
install_requires=['setuptools', 'ultralytics', 'opencv-python', 'torch'],Add the following entry point in the
entry_points/console_scripts section:
'object_detection_node = fossbot_object_detection.object_detection_node:main',- Build the package using
colcon:
cd /fossbot_ros2/ws_fossbot/colcon build --packages-select fossbot_object_detection && source install/setup.bash- Start the simulation:
ros2 launch fossbot_educational_description single.launch.py world:=sample_rooms.sdfIn a new terminal, spawn different objects in the simulation:
ros2 run fossbot_educational_description random_spawnerOnce the objects are spawned, run the object detection node:
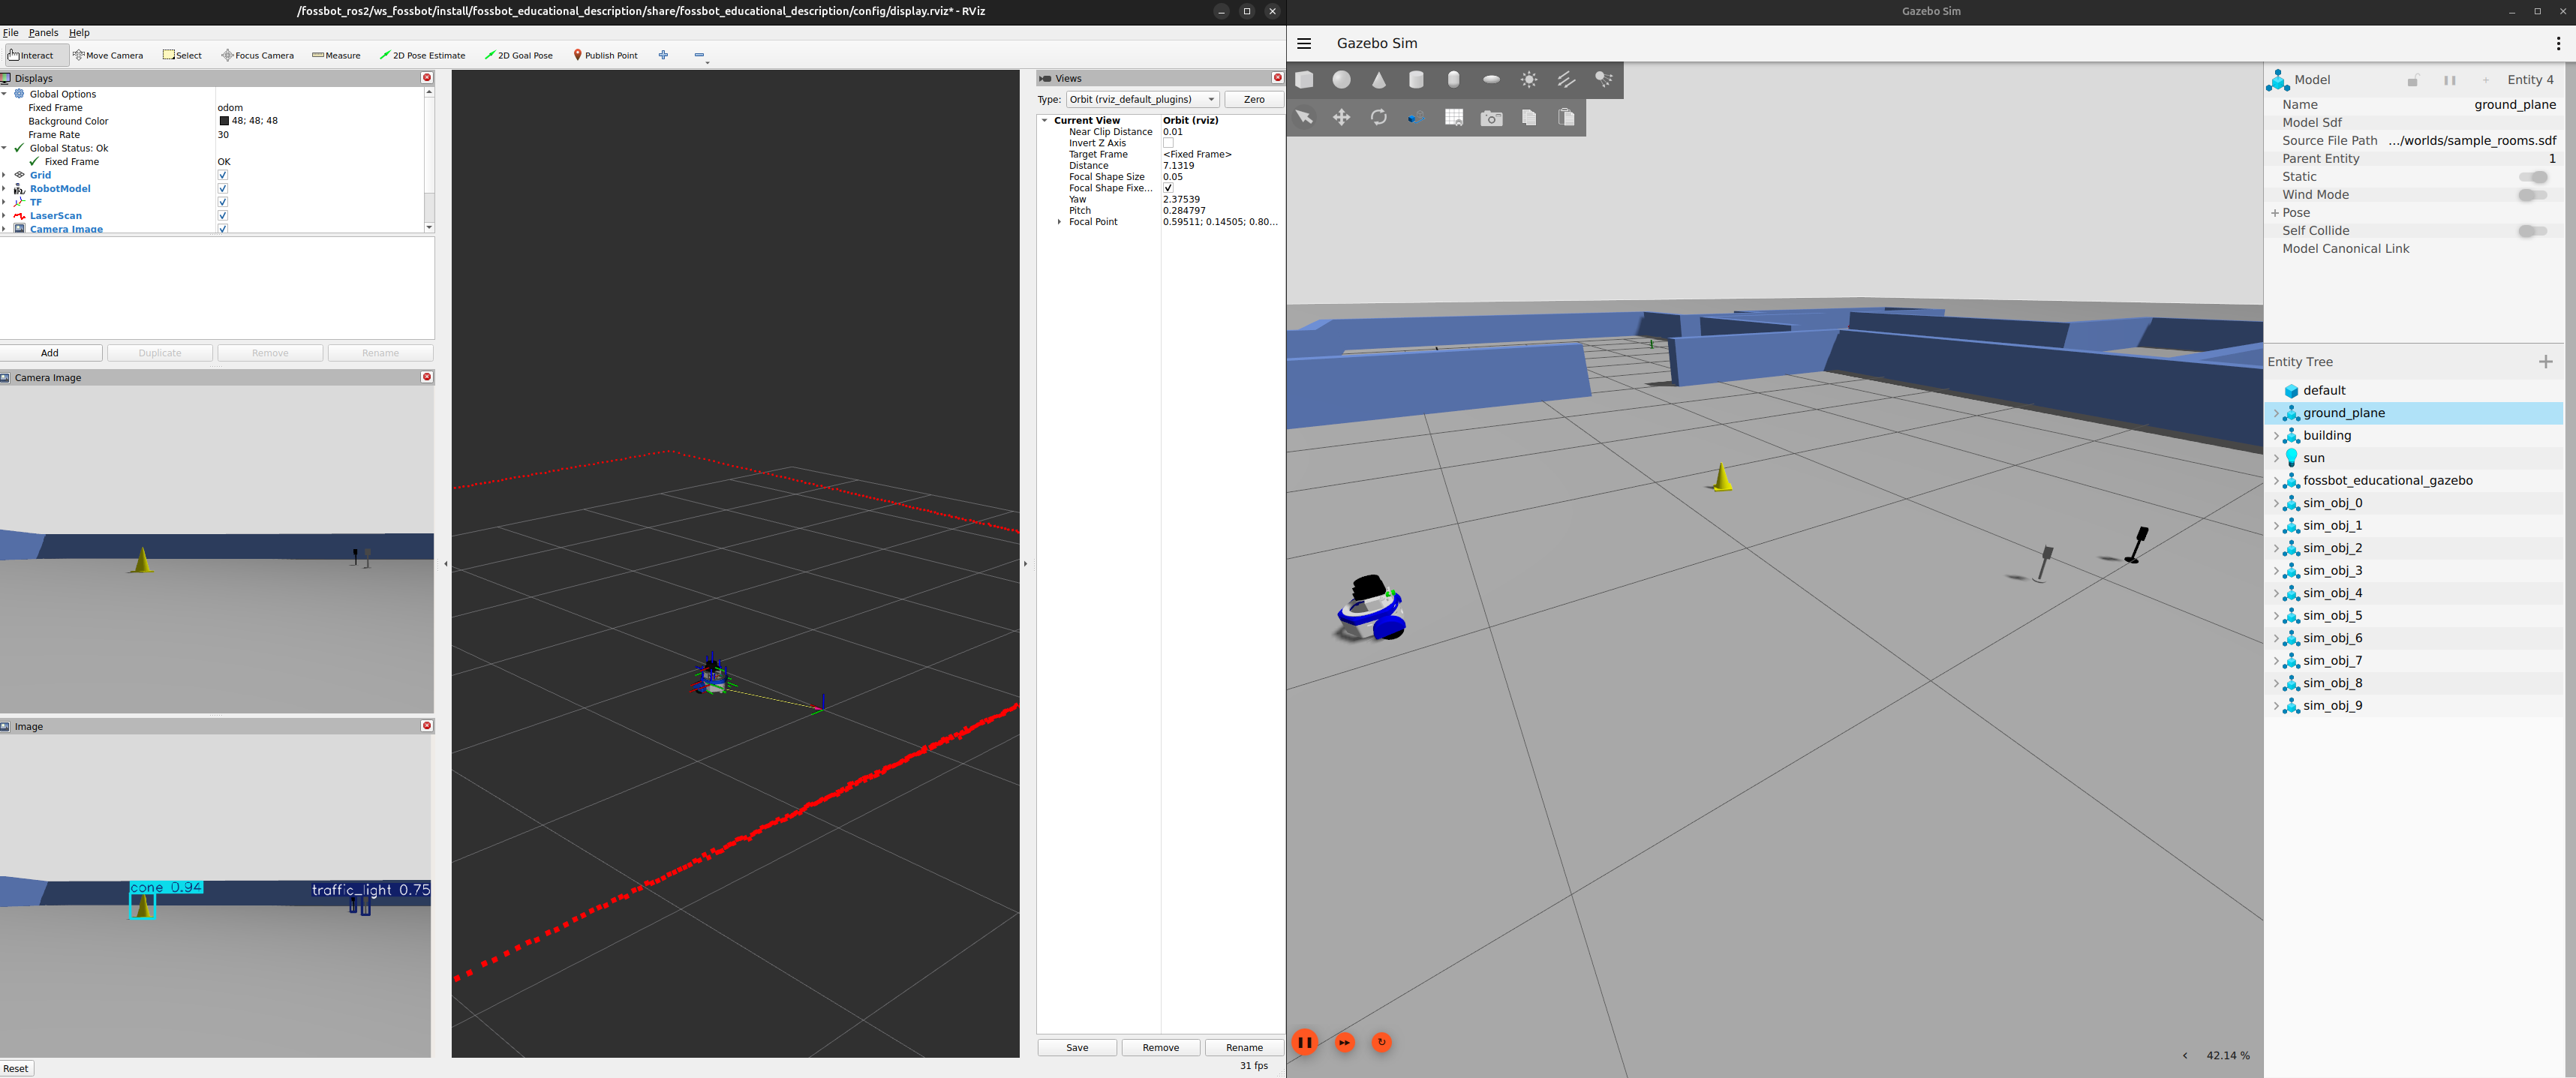
ros2 run fossbot_object_detection object_detection_nodeIn RViz2, add a new Image display and set the topic to
/yolo/annotated_image. You should see the camera feed with
bounding boxes around detected objects.
You can also drive the robot around the environment and observe how it detects and classifies objects in real-time. In a new terminal, run the teleoperation node:
ros2 run teleop_twist_keyboard teleop_twist_keyboardExpected result: The robot should be able to detect and classify objects in its environment using the trained YOLOv11 model. The annotated images with bounding boxes should be visible in RViz2.
Step 4 - Create a ROS2 action to navigate to a target object
In this step, you will implement an action that will allow the robot to navigate to a target object based on the detected bounding boxes. A ROS2 action is a mechanism that allows for long-running tasks with feedback (the feedback is provided continuously during execution) and result reporting (the result is provided upon completion). In this case, the action will take the class of the target object and the distance to the object as input and will command the robot to move towards it and stop at the specified distance.
Stop all the running nodes.
Create a custom action definition. Inside the
srcdirectory, create a new package namedfossbot_interfaceswith the following command:
ros2 pkg create --build-type ament_cmake fossbot_interfacesCreate a new directory named action inside the
fossbot_interfaces package and create a new file named
NavigateToObject.action.
mkdir -p fossbot_interfaces/actiontouch fossbot_interfaces/action/NavigateToObject.actionPaste the following content into the
NavigateToObject.action file:
# Goal
string object_class
float32 distance_to_object
---
# Result
bool success
string message
---
# Feedback
bool is_found
float32 current_distance
Update fossbot_interfaces/CMakeLists.txt. Find the
find_package(ament_cmake REQUIRED) line and add these lines
right below it:
find_package(rosidl_default_generators REQUIRED)

rosidl_generate_interfaces(${PROJECT_NAME}
  "action/NavigateToObject.action"
)
Update fossbot_interfaces/package.xml by adding these
three lines above
  <buildtool_depend>rosidl_default_generators</buildtool_depend>
  <exec_depend>rosidl_default_runtime</exec_depend>
  <member_of_group>rosidl_interface_packages</member_of_group>
Also update the fossbot_object_detection/package.xml
file by adding the following lines above
<depend>fossbot_interfaces</depend>Rebuild the packages:
cd /fossbot_ros2/ws_fossbot/colcon build --packages-select fossbot_interfaces fossbot_object_detection && source install/setup.bash- Implement the action server in the
fossbot_object_detectionpackage. Create a new file namednavigate_to_object_action.pyinside thefossbot_object_detectionpackage:
touch fossbot_object_detection/fossbot_object_detection/navigate_to_object_action.pyAdd it to the setup.py entry points:
'navigate_to_object_action = fossbot_object_detection.navigate_to_object_action:main',Paste the following code into the
navigate_to_object_action.py file and check the
instructions in the comments to complete the implementation:
import rclpy
from rclpy.node import Node
from sensor_msgs.msg import Image, CameraInfo
from geometry_msgs.msg import Twist
from cv_bridge import CvBridge
from rclpy.action import ActionServer
from rclpy.executors import MultiThreadedExecutor
from rclpy.callback_groups import MutuallyExclusiveCallbackGroup
import numpy as np

from fossbot_interfaces.action import NavigateToObject
from ament_index_python.packages import get_package_share_directory
import os
import time
from ultralytics import YOLO
import torch

class VisualNavigationNode(Node):
    def __init__(self):
        super().__init__('visual_navigation_node')

        # Setup Parameters and YOLO
        pkg_dir = get_package_share_directory('fossbot_object_detection')
        self.model = YOLO(os.path.join(pkg_dir, 'models', 'best.pt'))

        is_gpu = os.environ.get('IS_GPU_ENABLED', 'false').lower() == 'true'
        self.device = 'cuda' if is_gpu and torch.cuda.is_available() else 'cpu'
        self.model.to(self.device)

        # Setup CvBridge for image conversion
        self.bridge = CvBridge()

        # This allows the Action Loop to run in a separate thread,
        # while Image Processing runs safely one-by-one in another thread.
        self.camera_cb_group = MutuallyExclusiveCallbackGroup()
        self.action_cb_group = MutuallyExclusiveCallbackGroup()

        # Setup ROS Subscribers
        self.sub = self.create_subscription(
            Image,
            '/camera/image_raw',
            self.image_callback,
            10,
            callback_group=self.camera_cb_group
        )
        self.camera_info_sub = self.create_subscription(
            CameraInfo,
            '/camera/camera_info',
            self.camera_info_callback,
            10,
            callback_group=self.camera_cb_group
        )

        # Setup ROS Publishers
        self.pub_image = self.create_publisher(Image, '/yolo/annotated_image', 10)
        self.pub_cmd_vel = self.create_publisher(Twist, '/cmd_vel', 10)

        # Setup ROS Action Server
        self.action_server = ActionServer(
            self,
            NavigateToObject,
            'navigate_to_object',
            self.execute_callback,
            callback_group=self.action_cb_group
        )

        # State Variables
        self.target_class_name = None
        self.target_bbox = None  # Will hold [x_center, y_center, width, height]
        self.image_width = None
        self.focal_length = None
        # The height of the objects in meters (used for distance estimation)
        self.real_object_height = 0.15

        self.get_logger().info("Visual Navigation Action Server is Ready!")

    def camera_info_callback(self, msg):
        """ Callback to get camera info and compute focal length """
        if self.focal_length is None:
            # Focal length in pixels can be approximated as fx from the camera matrix
            self.focal_length = msg.k[0]
            self.get_logger().info(f"Camera info received. Focal length set.")

    def image_callback(self, msg):
        """ Processes the image and updates the state of the target bounding box """
        cv_image = self.bridge.imgmsg_to_cv2(msg, desired_encoding='bgr8')
        self.image_width = float(cv_image.shape[1])

        results = self.model(cv_image, device=self.device, verbose=False)
        annotated_frame = results[0].plot()
        self.pub_image.publish(self.bridge.cv2_to_imgmsg(annotated_frame, encoding='bgr8'))


        # Search for the target class in the detections
        target_found_in_frame = False
        if self.target_class_name:
            pass

            ### TODO: Implement the logic to find the target object in the detections and update self.target_bbox accordingly.

            # Useful variables:
            # results[0].names - a dictionary mapping class IDs to class names
            # results[0].boxes - a list of detected bounding boxes, each with attributes like
            # box.cls - the class ID of the detected object
            # box.xywh - the bounding box in [x_center, y_center, width, height] format

        if not target_found_in_frame:
            self.target_bbox = None

    def execute_callback(self, goal_handle):
        """ Executes when the user sends a Goal """

        if self.focal_length is None:
            goal_handle.abort()
            self.get_logger().error("Camera info not received yet. Cannot execute action.")
            return NavigateToObject.Result(success=False, message="Camera info not received yet.")

        recognized_classes = list(self.model.names.values())
        if goal_handle.request.object_class not in recognized_classes:
            goal_handle.abort()
            self.get_logger().error(f"Requested object class '{goal_handle.request.object_class}' is not recognized by the model.")
            return NavigateToObject.Result(success=False, message=f"Object class '{goal_handle.request.object_class}' not recognized.")

        if goal_handle.request.distance_to_object <= 0.2:
            goal_handle.abort()
            self.get_logger().error("Requested distance must be greater than 0.2 meters.")
            return NavigateToObject.Result(success=False, message="Distance must be > 0.2 meters but less than 1.5 meters.")

        if goal_handle.request.distance_to_object > 1.5:
            goal_handle.abort()
            self.get_logger().error("Requested distance must be less than 1.5 meters.")
            return NavigateToObject.Result(success=False, message="Distance must be > 0.2 meters but less than 1.5 meters.")

        self.get_logger().info(f"Received goal: Navigate to {goal_handle.request.object_class}")

        # Placeholder until the action loop is implemented
        # Remove it after implementing the action loop below
        return NavigateToObject.Result(success=False, message="Action logic not implemented.")

        feedback_msg = NavigateToObject.Feedback()
        cmd = Twist()

        ### TODO: Implement the action loop that will control the robot to navigate towards the target object based on the detected bounding boxes and the specified distance.
        ### 1. Rotate the robot to search for the target object if it's not found in the current frame (publish Twist message with angular velocity in z-axis).
        ### 2. If the target object is found, estimate the distance to the object using the bounding box height and the known real object height.
        ### 3. Adjust angular velocity based on the horizontal error (the bounding box center relative to the image center).
        ### 4. Move the robot forward until the distance to the object is less than or equal to the requested distance (publish Twist message with linear velocity in x-axis).
        ### 5. Once the robot reaches the desired distance, stop the robot, set success to True and reset the target. The callback should return a result indicating success.

        # In each iteration of the loop, publish feedback to the action client with the current state (is_found and current_distance).
        # To publish feedback use: goal_handle.publish_feedback(feedback_msg)

        # Control Loop
        while rclpy.ok():
            #### IMPLEMENT THE LOGIC HERE

            # Sleep slightly
            time.sleep(0.1)

def main(args=None):
    rclpy.init(args=args)
    node = VisualNavigationNode()

    executor = MultiThreadedExecutor()
    rclpy.spin(node, executor=executor)

    node.destroy_node()
    rclpy.shutdown()

if __name__ == '__main__':
    main()
To estimate the distance to the object, you can use the formula:
distance = (focal_length * real_object_height) / bounding_box_height- Rebuild the packages:
cd /fossbot_ros2/ws_fossbot/colcon build --packages-select fossbot_interfaces fossbot_object_detection && source install/setup.bash- Start the simulation:
ros2 launch fossbot_educational_description single.launch.py world:=world_for_object_detection.sdfAnd run your action server in another terminal:
ros2 run fossbot_object_detection navigate_to_object_action- In a new terminal, send a goal to the action server using the
ros2 action send_goalcommand. For example, to navigate to a “cactus” and stop at 0.5 meters:
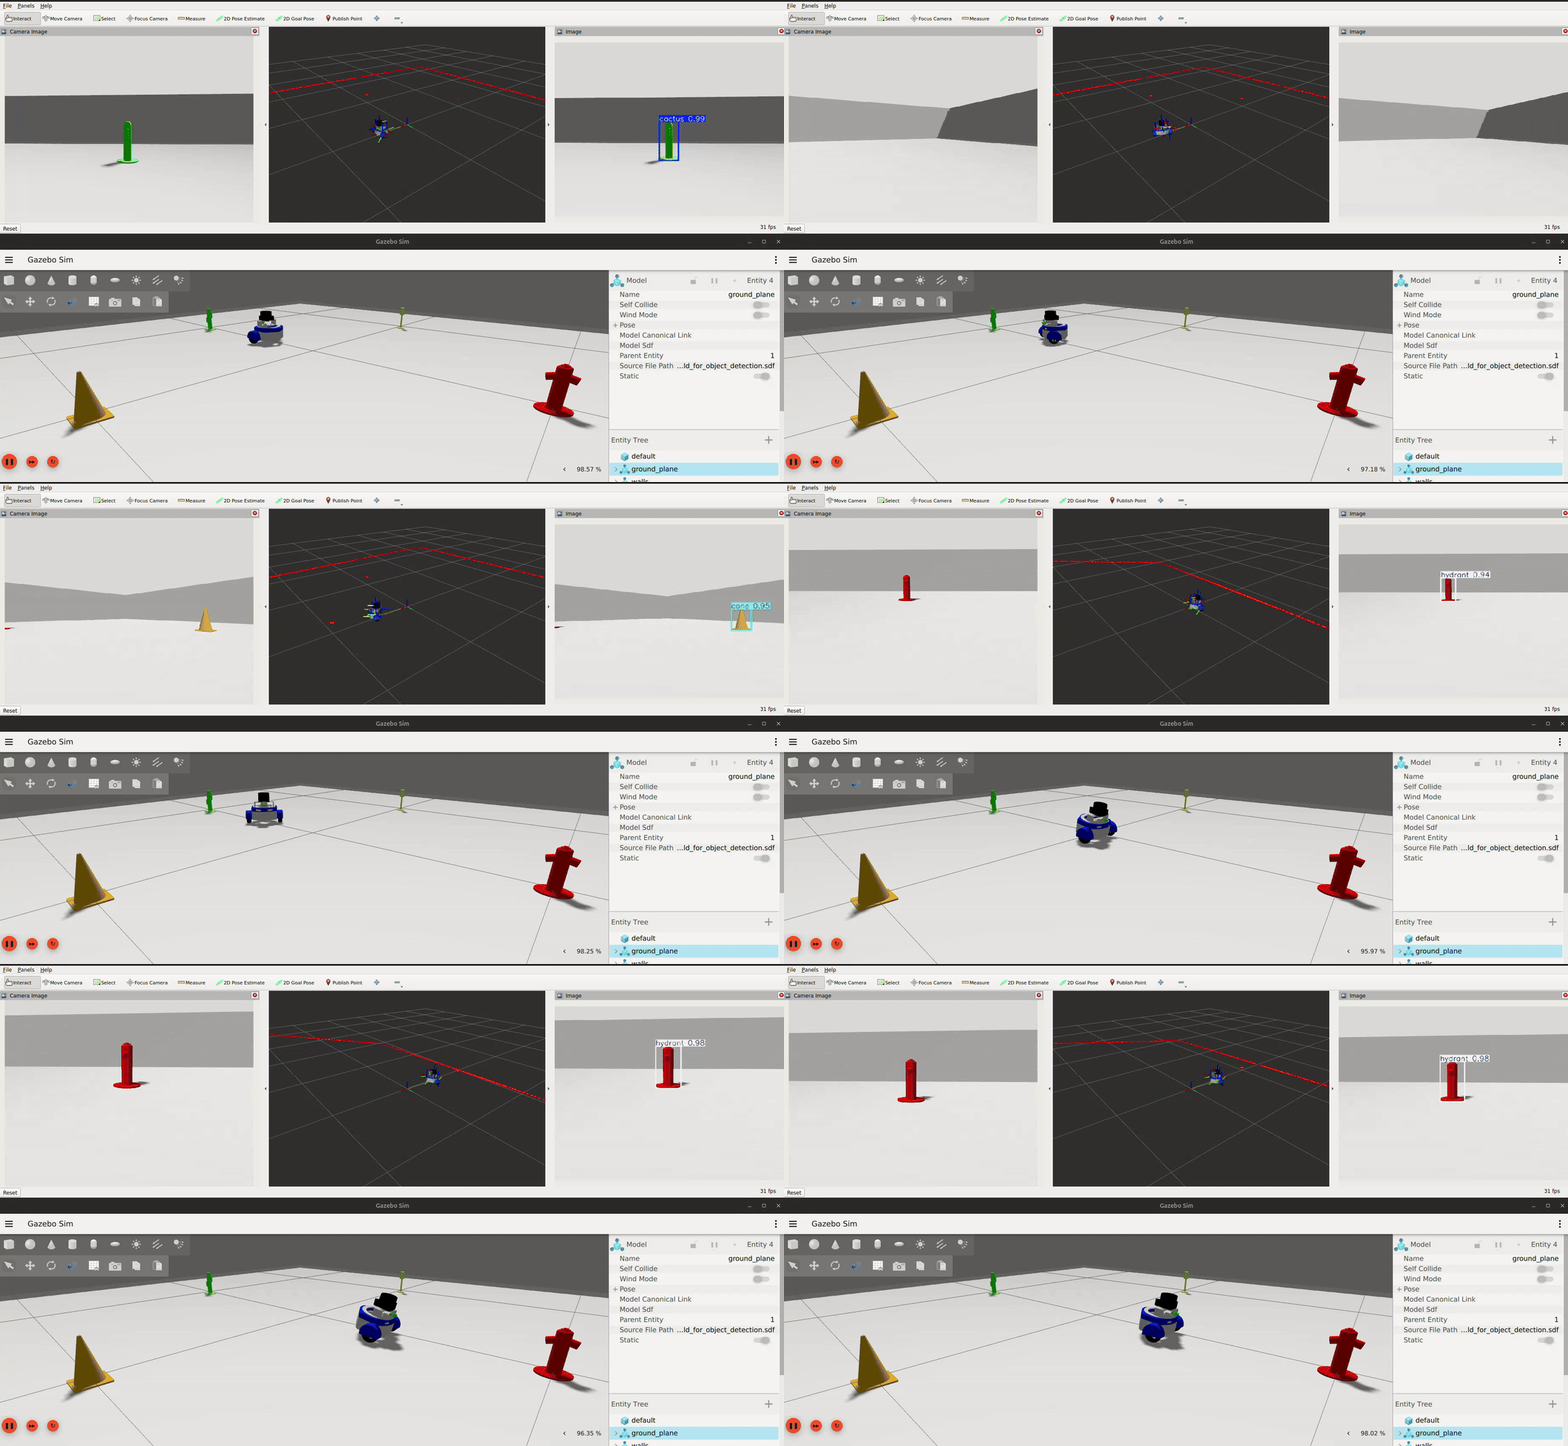
ros2 action send_goal /navigate_to_object fossbot_interfaces/action/NavigateToObject "{object_class: 'cactus', distance_to_object: 0.5}" --feedbackExpected result: The robot should rotate to search for the target object, center it in the camera frame, and move towards it until it reaches the specified distance. The action client should receive feedback about whether the object is found and the current distance to the object. Once the robot reaches the desired distance, it should stop, and the action should return a success result.
9. Analysis Questions
How does the YOLOv11 architecture (Backbone, Neck, Head) differ from traditional “sliding window” object detection methods, and why is this important for real-time robotics?
In your navigate_to_object_action.py script, how did you use the bounding box coordinates (xywh) to calculate the horizontal error for rotation and the distance estimation for forward movement?
What happens to your robot’s navigation logic if the camera temporarily loses sight of the target object (e.g., due to occlusion or turning too fast)?
Relying solely on a camera for navigation can be risky. How would you improve the robustness of this system (e.g., using other FOSSBot sensors) to ensure the robot doesn’t crash into unclassified obstacles while driving towards the target?
10. Submission Requirements
A screenshot of the RViz2 display showing the annotated camera feed with bounding boxes around detected objects
Completed source code from the
fossbot_object_detectionpackageA video/gif showing the robot navigating to a target object in the simulator or on the physical robot
Short answers to the analysis questions
11. References and Open Licence
- Ultralytics YOLO11: The object detection
capabilities in this lab utilize YOLO11, developed by Ultralytics:
- Repository: https://github.com/ultralytics/ultralytics,
- Documentation: https://docs.ultralytics.com/,
- FOSSBotEduSim repository: https://github.com/LRMPUT/FOSSBotEduSim,
- FOSSBot object detection repository: https://github.com/LRMPUT/fossbot-object-detection,
- Understanding ROS2 Actions: https://docs.ros.org/en/jazzy/Tutorials/Beginner-CLI-Tools/Understanding-ROS2-Actions/Understanding-ROS2-Actions.html,
- The object detection dataset for FOSSBot: https://data.mendeley.com/datasets/ysprcvwpjk,
- Redmon, Joseph, et al. “You only look once: Unified, real-time object detection.” Proceedings of the IEEE conference on computer vision and pattern recognition. 2016,
- Khanam, Rahima, and Muhammad Hussain. “Yolov11: An overview of the key architectural enhancements.” arXiv preprint arXiv:2410.17725 (2024)..
The Creative Commons Attribution 4.0 International (CC BY 4.0) license allows users to share, copy, distribute, and adapt the work, even for commercial purposes, as long as proper credit is given to the original creator.
EU funding disclaimer
Funded by the European Union. Views and opinions expressed are however those of the author(s) only and do not necessarily reflect those of the European Union or the European Education and Culture Executive Agency (EACEA). Neither the European Union nor EACEA can be held responsible for them.